Sony ILCE 7R Test Drive (alpha 7R)
So a bit of background information seems important so the reader can better understand my comments.
First, I have shot Nikon for many years and most recently D800’s (before that D700, D200, and D70). I shoot portraits and weddings. Occasionally I escape into the landscape world, but it is not very common. When I travel, in addition to at least one nikon, I will take a Sony NEX 5n with an 18-200mm 3.5-6.3/f. I also use the Sony as a walk around camera.
Second, I am looking for something lighter and less obtrusive than my D800, but with excellent image quality. For my Sony NEX 5n, there are three bothersome things: it is very difficult to see the LCD display in bright sunlight, the touch screen LCD can activate and change settings just by rubbing against my shirt and the placement of the dials on the right hand side make random activation and setting changes fairly easy. Lastly, the menu system and other tools to make changes is a bit cumbersome.
Having said all those things about the NEX 5n, please read my analysis as to how I have used the camera else where on my website. In general, I have found it to be a very productive and useful camera.
Second, while I find analytical analysis of lens and cameras helpful, I find it more helpful to understand how the camera/lens work in situations that I normally operate. For this particular test, I did not have a wedding to shoot, but I was shooting various things common to my world.
Third, where possible I will provide a comparative images with both the 7R and my D800, but this was not always possible.
Before I show images, I would like to provide some general comments based on my first four days having the camera in my hands. I started from ground zero as I had never used this camera before. The learning curve was not large for the majority of stuff (an evening plus some google searches), but there were a few things I had tried without great success. Not sure whether this was my problem or how the camera worked.
I also rented three lens: FE 24-70mm f4, FE 70-200mm f4 and the FE 55mm f1.8. Also used my 18-200mm 3.5-6.3/f and the camera automatically recognized the lens and reduced the captured area to 1.5x size.
Once I figured out a couple of things, I found the camera very simple to use. Perhaps the most important was the Fn button. This button brings up about 10 different areas that you can select in order to make changes. I don’t remember all of them and I believe it is possible to customize them. But many of the most important things to me were there such as ISO control, choice of auto vs manual focus, selection of area metering or spot metering. The second thing was the custom menu buttons, C1, C2 and C3. These you can use to quickly select/active certain settings quickly. I believe C1 is defaulted to activating the location of the spot focus selection which you then change.
The only thing I did not like about the dials was the placement of the video activation button. It is off to the right side and a bit ackward for me to activate.
Sony has substantially improved their approach to the array of Menu items. All the items in a particular section are immediately visible and you don’t have to scroll through a large number of choices. Much easier to find things.
Finally, I attempted to use the wireless control and while I could get it to work, it was very clumsy and I was only partially able to get pictures to transmit to my iPhone. After a few hours of work, I ran out of time to explore it further. Sort of frustrating.
One of the things I find very intriquing is the ‘Application’ portion of the menu. The implication is with an expanding array of Apps, additionally functionality could be extended. My desire for wireless control is also related to my desire for an absolutely still camera for long exposures or high detail work. In this regard, the absence of a shutter delay option to reduce camera shake prior to actually taking the picture is a serious omission. Also missing is a built in intervalometer. There is an App for the intervalometer, but not the shutter delay.
There has been much discussion about the mechanical first curtain shutter and shutter noise. I personally did not mind the noise, but I had to adjust to the fact there were two noises before the picture was complete. As I use the shutter noise to guide me as to whether my shutter speed is getting too slow, the 7R shutter noise really was very confusing and it made me feel the shutter was always slow. Once I got use to it, I learned I needed to monitor shutter speed my other approaches. (I shoot Aperture priority or manual most of the time).
And now for images. If you want to see a full size file, click on the picture or on the ‘Original image’ text below the image. Right click and save the image for your analysis. I have done some cropping of the original images to enhance their visual effects.

Comparison of the 7R with a 24-70 f/4 with a D800 with a 20-70 2.8 lens. Clearly the Sony is much smaller and lighter! Part of it is the f/4 lens, but the body makes a big difference.
Sony ILCE 7R with 24-70mm f/4 @ ISO 100, f4, 1/200 in manual mode (Original image)

Viewed at 100%
Sony ILCE 7R with 24-70mm f/4 @ ISO 100, f4, 1/400 in aperture priority (Original image) Kid in motion ready to sample the fish food. Not quite focused on the worm, but I was working fast to make sure the worm did not go any further!

Viewed at 100%
Sony ILCE 7R with FE 55mm f/1.8 @ ISO 200, f4.5, 1/2500 in manual mode (Original image)

Viewed at 100%
Sony ILCE 7R with FE 55mm f/1.8 @ ISO 200, f4, 1/125 in manual mode (Original image)

Viewed at 100%
Sony ILCE 7R with 70-200mm f/4 @ ISO 1000, f4, 1/160 in manual mode (Original image)

Viewed at 100%
Nikon D800 with 70-200mm f2.8 VRII @ ISO 800, f4, 1/160 in manual mode. If you compare this image to the image above you can get a feeling for the difference/similarity between image quality of the 7R and the D800(Original image)

Viewed at 100%
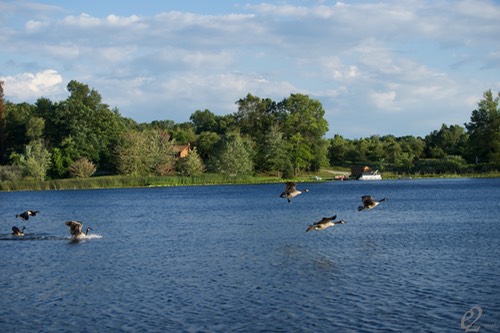
Sony ILCE 7R with 70-200mm f/4 @ ISO 100, f5.6, 1/320 in aperture priority mode (Original image). Heard them calling and turned to see them. Did my best to get the camera focused on one of the three birds on the right. Fractions of a second to get this image.

Viewed at 100%
In summary, I believe the 7R is an excellent camera, substantially superior to the NEX 5N and while the image quality is highly competitive with the D800, other issues would not let me pick it for my professional activities. These issues include the following:
1. Slow refresh rate after a picture has been taken
2. Lack of off camera lighting support (no miniTT1, Flex5 kind of support)
3. Single card rather than dual card.
HOWEVER, if I want an excellent camera for travel and weight/size are an issue, then the Sony ILCE 7R is a very good choice. For me, the lack of second card makes me pause a bit.
Still not sure, rent one and use and test it in your environment. I rented from LensRentals, and excellent organization to do business.
Taking pictures of fireworks and other things in the dark!
Whether one is shooting fireworks or stars or anything else in low light with some discrete bright objects, there are a few critical concepts:
1. A steady camera is a must: tripod and release cable will work well and in critical situations you can even use shutter delay to reduce camera motion caused by the shutter movement
2. Exposure for the bright objects
3. Use shutter speed to capture difficult to time bright events
So the first two examples are just old fashion firework pictures. These were taken at ISO 100, f9 (and perhaps I should have pushed that up to f11 or so), 24mm and a manual (bulb) shutter release controlled with a release cable. Camera focus was focused on an object at about 7-8 feet and then switched to manual. I selected this distance by calculating the hyperfocal distance for my lens/camera. A nice piece of software for this calculation is called DOFMaster.


If you want to see more examples, please visit this page of my website.
For the next picture, I used ISO 100, f9, 58mm for a total of 30 seconds. I adjusted the expoure duration and aperture so I can leave the shutter open long enough to capture the random and untimed firing of fireworks across the lake. In this way, I did not need to time the firework which are quite bright when they are fired.

And for the last picture of a meteor, I first decided my exposure time maximum. I determined this by dividing 600 by the focal length (24mm) or 25 seconds. I then selected the aperture and ISO to yield a nice exposure of the stars. In this case it was f2.8 at ISO 1000 and this exposure value did not blow out the lights on the ground too much. I also focused my camera on the horizon and then switched it to manual so it would not change. Once my exposure was set and my camera was placed on a steady tripod, I then turned on the interval shooting timer (in Shooting Menu on the Nikon D800). I discovered the interval timer needed to be set longer than the exposure time. I selected 28 second intervals so I lost about 4 seconds of exposure and to capture this one image I took 400 images for a total captured time of about 3 hours. This is the single picture I got of a meteor during the Camelopardalids meteor shower.


